Processing
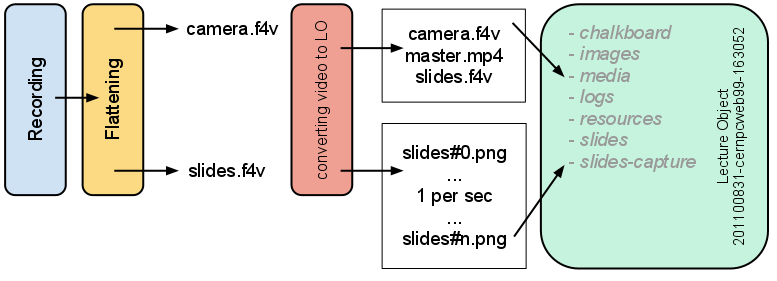
The input of the processing steps are camera.f4v and slides.f4v, inside a folder named as Lecture Object name. To understand how they are generated, please refer to the documentation about Recording.
The output is a fully structured lecture object folder ready to be published in several formats.
Steps involved during by the processing module:
- Flatten video files
- Convert video files to Lecture Object folder
- Analyze extracted slides
- Create previews
- Install metadata in the Lecture Object folder
- Fill up the xml with the timing of the slides
- Upload the lecture to the media repository
These scripts are managed by a daemon script which has the task to execute them every predefined slot times, with multithreading, and it is enabled/disabled using the administration web interface.
Note
The source code of each file is well commented. Check inside the scripts to understand in-depth how it works.
1. Flattening
Adobe Media Live Flash Encoder encodes video files in the unflattened format .f4v. When the encoding is finished, it is necessary to execute the f4vpp.exe (Post processing free tool from Adobe) on each file to be able to play it using a standard media player. The script takes as input an unflattened video file and converts it to a playable video file.
Usage:
flatten_f4v.py [--verbosity=VERBOSITY_LEVEL] [--debug=DEBUG_LEVEL]
Task involved
flattening f4v files
Code explanation
It retrieves all the lectures in the database with the status COMPLETE for the recording task and with the status REQUESTED for this task. Using the OriginPath, it starts to flatten camera.f4v and slides.f4v in-place (in the same folder), renaming the original file to unflatten_camera.f4v and unflatten_slides.f4v. If the files are already flatten, it simply restores the original filenames.
2. Convert video files to LO
This script converts two video files (one camera feed and one slides feed) into a lecture object. Once it has been converted it is identical to other lecture objects and the rest of the processing is the same.

Usage:
webcast2lectureobject.py [FULL_PATH_LO | camera=FULL_PATH_CAMERA slides=FULL_PATH_SLIDES ] [--start=HH:MM:SS] [--end=HH:MM:SS] [--verbosity=VERBOSITY_LEVEL] [--debug=DEBUG_LEVEL]
Normally this script is run by the processing daemon with 0 command line arguments. You can run this script manually with either 0, 1 or 2 command line arguments.
0 command line arguments
If the recording was done by the windows_adobe web interface, then the files will already be labeled correctly and registered in the micala monitoring database. In this case you should not provide any command line arguments, and the script go into batch mode, checking the database for lectures waiting to be processed.
1 command line argument
If you have a properly named lecture object directory, containing properly named camera and slides files (e.g. camera.f4v and slides.f4v), then you can provide a single command line argument, which should be the full path to the lecture object directory containing camera and slide files:
webcast2lectureobject.py \\MediaArchive\Video\Public\Conferences\2010\20100806-recordingmachine04-140000
2 command line arguments
If you have two properly named camera and slides files, in a non-standard directory, you can provide absolute paths to both files on the command line. The filename MUST have date, machine and time in the format yyyymmdd-machine-hhmmss_camera.ext and yyyymmdd-machine-hhmmss_slides.ext:
webcast2lectureobject.py \\MediaArchive\Video\Public2\Conferences\2010\102669\20100806-recordingmachine04-140000\camera.f4v \\MediaArchive\Video\Public2\Conferences\2010\102669\20100806-recordingmachine04-140000\slides.f4v
Task involved
converting video to LO
Code explanation
Check the database to find if there are present lectures with status for this task set to REQUESTED.
Create the local temp folder conf.dir_tempLOID (deleted if it already exists).
Crop the video if a cropping time is provided.
Capture slides (one PNG/second) and put in slides-capture folder.
Create master.mp4 and put in media folder.
The RawLO content is:
\LOID\
    media\
        camera.f4v (flattened)
        slides.f4v (flattened)
        master.mp4 (Encoded master.mp4)
    slides-capture\
        one PNG/second (of slides.f4v)
Move the entire folder to conf.dir_to_analyzeLOID
3. Analyze extracted slides
The script tries to reduce the number of extracted slides from one PNG per second to the real sequence played during the lecture by the speaker. Its algorithm uses the OpenCV library, calculating the Norm L2 of 2 images. For more information, refer to OpenCV library documentation.
- Usage::
- screen_analyze.py [–lo=LECTURE_OBJECT_ID] [–threshold=LEVEL] [–verbosity=VERBOSITY_LEVEL] [–debug=DEBUG_LEVEL]
Task involved
analyzing screen
Code explanation
As usual, the script checks if the task is REQUESTED for any lecture: in this case it starts to work on this. Rename the folder appending the label _analyzing, to be sure it is clear that the script is working. Check if there is more than one slide, it means the video is not a static image and last more than one second. It starts to compare one slide with its follower: if the comparison, using the comparison provided by the NORM_L2 method of the OpenCV library, is higher than a threshold set in the conf file, it means the 2 images are clearly different, so it copies the second to slides-analyzed folder. Otherwise, the second slide is very similar to the first and it is not copied.
Note
During this process, the script maintains also a window of how many slides are equal: when the speaker changes slide, or there is an animation during the change, we don’t want to keep a slide with the animation effect in it. If it is possible, due to this animation and timing-hardware constraints, we try to keep the second slide of a series of equal slides. Its quality is usually better than the first.
When copying a slide to the slides-analyzed folder, the filename can change: it is important because it contains the timing of the slide. If the second slide of a series is taken, than it is renamed with the same name of the first: this is done on purpose to keep the timing in the right order.
The second part of the analysis is refining the first pass: normally, slides which last only one second are not important and they are deleted. They are transition between slides, or it can happen that the speaker comes backward fast to a precedent slide because of a question. The result is a series of one second slides until the one where the speaker stopped.
Two seconds slide are instead kept.
Finally, the script checks the filename of the first slide matches with the lecture object starting time, and in case renames it. A human task to check the analysis is correctly done is now requested before the final publication.
Note
The algorithm used for the comparison is currently showing very good results: it can process standard lectures without any human intervention at the end of the analysis. This algorithm has been replaced from the previous one, which was implemented using ImageMagick comparison: it was keeping many false-positive slides, forcing the operator to an in-depth analysis after.
Moreover, at the time of choosing a better comparison algorithm, OpenCV NORM_L2 has been chosen comparing the results on many lectures between ImageMagick, PIL and OpenCV and for each of them, comparing several algorithms.
The threshold level can be adjusted on the conf file, according to your capture device quality and images quality. In our cases, a value of 110 seems to be a well balanced.
At the end it just rename the folder removing the label _analyzing and move it to the Lecture Objects folder.
4. Create previews
This task has been created to have a preview of the lecture, without watching the original video file. The previews are GIF animated images showed in the web interface.

Usage:
create_preview.py [--lo=LECTURE_OBJECT_ID] [--path=OUTPUT_PATH] [--verbosity=VERBOSITY_LEVEL] [--debug=DEBUG_LEVEL]
This task is usually automatically called during the processing task.
Task involved
building preview
Code explanation
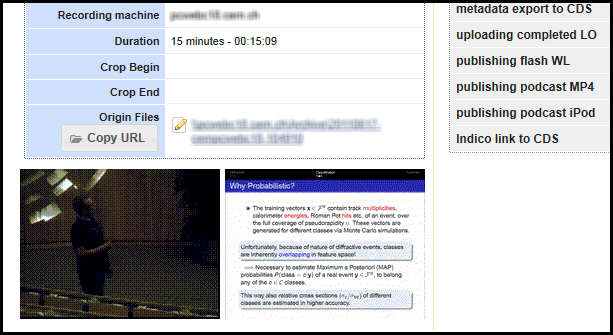
The script creates thumbnail GIF previews for camera and video. It captures some JPEGs from the video files, and mixes them together. Using FFMPEG, it generates two GIF files.
GIF images are then moved to webserver dir so they can be displayed in the monitoring web interface and recording manager.
Output:
conf.dirWebPreviews\LOID\camera.gif
conf.dirWebPreviews\LOID\slides.
5. Install metadata
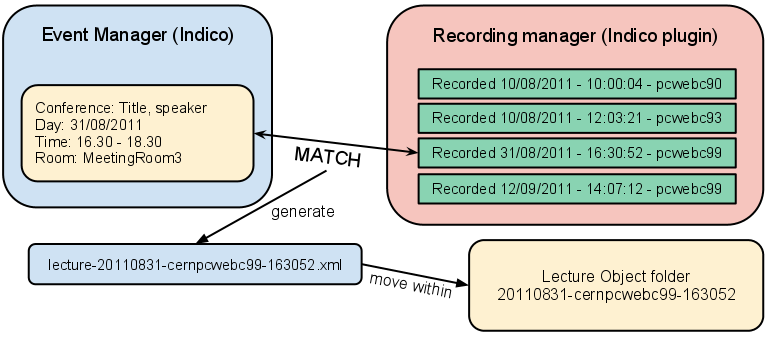
At any time, this task can be run and install the metadata inside the Lecture Object folder. The script is very simple: it takes a xml file, the lecture object xml, and copies it inside the folder. This is very important, because inside this xml, you can find all the metadata information of the lecture: title, creator, language time and, later, series of slides. For more information, read the section about the explanation of the concept of Lecture Object.
We are current using a plugin for Indico (Event management software at CERN), to match the event with the recorded lecture. This fills up the lecture object xml with the info of the event.
Note
This task can be run immediately after the creation of the lecture object folder BUT before the upload task, which means fill up the xml with the slides analyzed and timing ready to be published. The flash player and podcast use this xml to play the lecture.

Usage:
install_metadata.py [--lo=LECTURE_OBJECT_ID] [--verbosity=VERBOSITY_LEVEL] [--debug=DEBUG_LEVEL]
Task involved
metadata export to micala
Code explanation
When executed, it checks the input folder where to find the xml file: this xml has to be named in the format lecture-YYYYMMDD-machine-HHMMSS.xml. Parsing the filename, it is possible to install (move) the xml inside the right lecture object folder when found.
6. Generate slides timing
When the metadata lecture object xml is installed AND the slides are analyzed and moved in slides folder, it is possible to execute this script. It takes all the slides filenames from the slides dir and fill up the xml file adding a row for each slide found, with the info of the filename and the calculated beginning time of the slide.
Usage:
create_xml_timing.py [--lo=LECTURE_OBJECT_ID] [--start=FORMATTED_TIMESTAMP] [--verbosity=VERBOSITY_LEVEL] [--debug=DEBUG_LEVEL]
Task involved
uploading completed LO
Code explanation
For each slide found in slides folder, it calculates the relative beginning time from the starting time. It means that the first slide starts at 0 seconds, then the second starts immediately at the end of this. The beginning time of the second is calculated subtracting the filename of the current slide with the previous one.
It can happen that the lecture is only a video, the speaker has no slides or slides video is somehow corrupted. In this case, if no slides are found in slides folder, a dummy slides image is inserted, indicating that there are no slides available.
Note
The first slide filename MUST match with the lecture object folder filename: it means that the times have to be equal.
7. Upload to media repo
The lecture is ready to be uploaded. This script simply calls create_xml_timing.py and when finished, it creates a tarball of the lecture and moves it to the media repository, ready to be published.
Usage:
upload_lo.py [--lo=LECTURE_OBJECT_ID] [--verbosity=VERBOSITY_LEVEL] [--debug=DEBUG_LEVEL]
Task involved
uploading completed LO
Code explanation
- Monitor the UPLOAD-HOTDIR folder, to find new lectures ready to be uploaded.
- When one new lecture object folder is found, it checks if it is REQUESTED since at least one minute: this is done to be sure the folder was correctly and entirely copied, in case the size is very big.
- When ready, it checks if the images format inside slides matches with the one set in the config file: for example if the slides are .jpg, but in the conf file is set to use PNG, it converts all of them to .png.
- Check if lecture.xml is inside, otherwise it fails with a error message.
- Call create_xml_timing.py to calculate slides timing.
- Rename the folder according with the Event manager (Indico) ID. This is done because currently CERN Document Server is using Indico IDs to recognize the lecture.
- Create the tarball.
- Move the .tar to the media repo.